
Imeant to post this a while back (say, back when I'd actually finished the work in early September), but didn't get around to unloading the pictures from the camera until today. In any event, here's a sped up version of process of renovating K's office. We tore out the drywall in the outer walls; ran new electrical, phone and Cat-5; straightened out the door; installed an exterior light outside the door; and insulated the walls. And of course repainted everything when we were done.
While the walls are open, you can see why blown in insulation as a retrofit would be more difficult. Not only are there diagonal braces between the studs, but there are some horizontal braces here and there, too. So it would mean at least 3 holes in some stud bays.
Showing posts with label insulation. Show all posts
Showing posts with label insulation. Show all posts
Monday, October 11, 2010

Monday, March 15, 2010
So I Forgot...
Today I finished insulating the attic. Or at least finished getting one layer down. If you've been following for any length of time, you may be surprised that I'm only now getting to that. When I bought the house, there was no insulation (except for a bit of Kimsul around the main vent stack). Over the years I put insulation in most of the attic, but about the time I was getting to the dining room and kitchen area was when we were deciding to build the addition and remodel the kitchen. So those parts of the house have sat without insulation in the attic, and well...I forgot about it.
On Wednesday we're having a home energy audit, and it occurred to me that I'd never finished insulating the attic. So after a late start (thank you, Daylight Saving Time), I went and measured to figure out how much more insulation I'd need then made a trip to Home Depot. Ideally there'd be R-30 or better everywhere, but the odd joist spacing means there are some gaps, and the design of the roof means it gets pinched (as well as divided oddly, since the rafters don't match the ceiling joists) at the edges. But now there's at least R-25 in most of it except an area I used up some R-19 in. My plan is to put a second layer across the whole attic (well, except the edges where it won't fit) cross-wise. The energy audit should be detailed enough to give me some idea of how much that will help. But regardless, it's nice to know there's finally insulation in the whole attic, after 16 years of living here.
On Wednesday we're having a home energy audit, and it occurred to me that I'd never finished insulating the attic. So after a late start (thank you, Daylight Saving Time), I went and measured to figure out how much more insulation I'd need then made a trip to Home Depot. Ideally there'd be R-30 or better everywhere, but the odd joist spacing means there are some gaps, and the design of the roof means it gets pinched (as well as divided oddly, since the rafters don't match the ceiling joists) at the edges. But now there's at least R-25 in most of it except an area I used up some R-19 in. My plan is to put a second layer across the whole attic (well, except the edges where it won't fit) cross-wise. The energy audit should be detailed enough to give me some idea of how much that will help. But regardless, it's nice to know there's finally insulation in the whole attic, after 16 years of living here.
Friday, January 23, 2009
House History

ineffective insulation, anyone?
First, I found more of that weird insulation I'd found in the other wall of the bathroom. I'd found out before it was paper pulp insulation and it didn't have asbestos, but that was it. This time, it was intact enough to find out exactly what it is. It's Kimsul insulation from Kimberly-Clark. In researching what that is, one reference said it was made famous by that finest of home improvement films, Mr. Blandings Builds His Dream House. (Cary Grant apparently says, "Wrap your home in a blanket of Kimsul." I've seen the movie several times, but don't recall that. I love it, so I'll just have to watch it again.)

DIY, 1943 style
In any event, why they'd put the insulation here was even more a mystery than the other piece I'd found. This was again in an interior wall. But only in one stud bay, and only in the upper half of it. It obviously wasn't for warmth, and only being in part of the wall, it wasn't going to do much for noise reduction. It also showed serious compression and sagging, which isn't too surprising given it's made of paper.

Mouse Hawkins
City Homestead just blogged about some names they found in their house. What sort of interesting things have you found out about or in your house?
Thursday, January 08, 2009
Ooo...we're trendy
According to builderonline.com (via Charles and Hudson) our house is pretty trendy and has features that will help boost its value with buyers. We have their "10 Things You Must Put in Your Next House" list pretty decently covered:
- Radiant-heated bathroom floors - check
- Butcher block countertops - nope
- Glass tiles - considering for the kitchen
- Dual flush toilet - check
- Low-flow showerheads - check
- On-demand water heater - check
- Water re-circulator - considered, rejected for now because our water usage is low
- Folding patio-door - maybe if we had a bigger house...
- Central vacuum - nope
- Excellent insulation - check -- I've blogged about this before (1, 2)
Back to work
Today I worked on the house again. Not cleaning, not moving stuff, but actual home improvementy-type stuff.
Actually I did some yesterday, too, putting up radiant barrier insulation under the addition. But mostly I rearranged some of my computer gear (to put the wireless router up higher, amongst other things, for better reception around the house) and cleaned up my office a bit, so it didn't really feel like working on the house, because it mostly wasn't.
But today there was no cleaning. I rerouted the circuit for our offices (bedrooms #2 and #3) from one subpanel to the other. I'd originally run it to the subpanel I added for the addition and kitchen, because there wasn't room on the main panel and I hadn't added the other subpanel yet. But it makes a lot more sense location-wise on the 2nd subpanel, and frees up a slot for the myriad circuits that will be needed for the kitchen. I also pulled out the last of the old electrical runs that I replaced with new, up to code runs back in November.
On the less fun end of the spectrum was pulling out some of the insulation the POs had installed incorrectly. What part of "do not leave facing exposed" was unclear? The unfun part was playing Russian roulette, and hoping the next piece I pulled down wasn't covered in mouse droppings. Urgh. Anyways, I pulled it down where I was running electrical, installed some radiant barrier insulation, and reinstalled the unsoiled insulation the right way around.
So at the end of the day, nothing looks different. But it will simplify running electrical for some new outlets in K's office, and will simplify things later.
Actually I did some yesterday, too, putting up radiant barrier insulation under the addition. But mostly I rearranged some of my computer gear (to put the wireless router up higher, amongst other things, for better reception around the house) and cleaned up my office a bit, so it didn't really feel like working on the house, because it mostly wasn't.
But today there was no cleaning. I rerouted the circuit for our offices (bedrooms #2 and #3) from one subpanel to the other. I'd originally run it to the subpanel I added for the addition and kitchen, because there wasn't room on the main panel and I hadn't added the other subpanel yet. But it makes a lot more sense location-wise on the 2nd subpanel, and frees up a slot for the myriad circuits that will be needed for the kitchen. I also pulled out the last of the old electrical runs that I replaced with new, up to code runs back in November.
On the less fun end of the spectrum was pulling out some of the insulation the POs had installed incorrectly. What part of "do not leave facing exposed" was unclear? The unfun part was playing Russian roulette, and hoping the next piece I pulled down wasn't covered in mouse droppings. Urgh. Anyways, I pulled it down where I was running electrical, installed some radiant barrier insulation, and reinstalled the unsoiled insulation the right way around.
So at the end of the day, nothing looks different. But it will simplify running electrical for some new outlets in K's office, and will simplify things later.
Tuesday, December 30, 2008
Go Green for Less
As I've written about before, better insulation and sealing of houses are the low-hanging fruit of energy-efficient homes. There's a nice article over at the NY Times titled Focus on Weatherization Is Shift on Energy Costs. It's shocking how much waste there is. Our house here in California had no insulation when I moved in. Todd over at Home Construction Improvement recently blogged about his first home in New England(!!) not having any insulation. Insulating your walls might cost a bit if done all at once, but it's easy to do if you've got a wall open for some other project. It just makes sense to make efficient use of the resources we've got before investing in higher-priced improvements like new windows and solar panels. From the NY Times article:
Correct those flaws, and heating and cooling costs are typically cut by 20 percent to 30 percent, a saving of more than $1,000 annually in some households. In addition, carbon dioxide emissions and the strain on the national electric and gas systems are reduced.Save money, save energy and have a more comfortable house. What's not to like?
Typical repairs require expertise but generally cost $2,000 or less.
Wednesday, December 10, 2008
Still my favorite
Nothing too exciting with regards to progress on the house, but the new headlamp is still awesome. I've been continuing to update electrical (the carport light works again, though I still need to replace the run from under the house up to the carport), remove old electrical, and install insulation. One nice thing about my new headlamp that some of the cheaper options didn't have is that it can be turned upward slightly. When you're looking down, the normal setting is great. When you're looking up (such as between some floor joists), the little bit of adjustment is perfect.
The house is still lacking insulation in a lot of places, but at least there's now a radiant barrier under the areas where there's nothing but subfloor. It stops the worst of the drafts, as well as reducing heat transmission. I'll add batt insulation after the kitchen is done, and I'm done pulling wire and extending the pipes for the new sink location. The slight bit of additional insulation is just in time, too. The forecast calls for highs in the high 40s (versus the high 60s / low 70s we've got now) and rain in the coming days.
The house is still lacking insulation in a lot of places, but at least there's now a radiant barrier under the areas where there's nothing but subfloor. It stops the worst of the drafts, as well as reducing heat transmission. I'll add batt insulation after the kitchen is done, and I'm done pulling wire and extending the pipes for the new sink location. The slight bit of additional insulation is just in time, too. The forecast calls for highs in the high 40s (versus the high 60s / low 70s we've got now) and rain in the coming days.
Wednesday, December 03, 2008
Working with Denim Insulation
Insulation isn't sexy -- CFLs, solar panels, green roofs, those get all the green love. But there are some interesting green insulation options, like soy-based spray foam, and denim batts. Better insulation and sealing of houses is the 'low-hanging fruit' of energy-efficient homes. We need more efficient and affordable solar and other technological innovations, but the most cost-effective place to start is sealing the building envelope. That's been an ongoing project here, since even before the addition. When I moved into the house, there was almost no insulation.
I hadn't worked with denim insulation before, but I'm always interested in greener options. After using up the rest of the traditional R-19 roll I had, I got some UltraTouch. It's made from recycled denim (post-industrial waste) and so has a lovely blue color.
The first thing I discovered is its hecka dusty. Most batt insulation gives off some dust (plus it's all very good at absorbing dust wherever it is.) Usually it's not-good-for-you fiberglass fibers it's giving off. But when I was stuffing the denim batts between the floor joists, I observed a veritable storm of dust coming down. After putting up a couple of batts, there was a visible blue layer on top of the washing machine.
The second thing I discovered is that its hard to cut the usual way (i.e., with a utility knife or a pair of scissors). The UltraTouch website suggests a $30 Cepco insulation knife, a Bosch Foam Rubber Cutter, a hand held grinding tool, or a table saw. Huh? OK, they all make some sense, but I'mtoo cheap too frugal not ready to buy a special tool just to work with insulation batts. And my table saw blade doesn't come out nearly far enough to cut a batt of R-19. So I read a little closer, and noticed it also mentions using a circular saw with the blade reversed. At least with the circular saw you can easily compress the insulation as you cut it. I put my cement and Hardiboard blade on instead of reversing my regular blade, and it works quite nicely. I also found a little handsaw works pretty well for making those little partial cuts you need for getting insulation around a pipe or wire.
Despite the dust and the increased difficulty cutting it, my vote so far is a big thumbs up. The blue dust is much preferable to fiberglass fibers, and the cost was comparable to traditional batts.
Have any of you worked with denim insulation? What's your experience been?
I hadn't worked with denim insulation before, but I'm always interested in greener options. After using up the rest of the traditional R-19 roll I had, I got some UltraTouch. It's made from recycled denim (post-industrial waste) and so has a lovely blue color.
The first thing I discovered is its hecka dusty. Most batt insulation gives off some dust (plus it's all very good at absorbing dust wherever it is.) Usually it's not-good-for-you fiberglass fibers it's giving off. But when I was stuffing the denim batts between the floor joists, I observed a veritable storm of dust coming down. After putting up a couple of batts, there was a visible blue layer on top of the washing machine.
The second thing I discovered is that its hard to cut the usual way (i.e., with a utility knife or a pair of scissors). The UltraTouch website suggests a $30 Cepco insulation knife, a Bosch Foam Rubber Cutter, a hand held grinding tool, or a table saw. Huh? OK, they all make some sense, but I'm
Despite the dust and the increased difficulty cutting it, my vote so far is a big thumbs up. The blue dust is much preferable to fiberglass fibers, and the cost was comparable to traditional batts.
Have any of you worked with denim insulation? What's your experience been?
Wednesday, July 30, 2008
Raiders of the Lost Insulation
The shower is completely tiled, and while the grout is curing, I've been working on other things. Yesterday I used my newly revamped ladder to paint under the eaves above the back windows. Still a pain in the back to paint over your head (how did Michelangelo do the ceiling of the Sistine Chapel?), but much easier with the ladder levelers and stabilizer making the whole thing easier to position (it now goes around windows!) and much, much more stable.
Today I went and picked up some free drywall (I love freecycle.org!), and rented a jackhammer to remove the old front porch, which will be enclosed and become part of the kitchen. It was covered in flat pieces of sandstone with bricks around the inside edges. I figured it was a good day to do it because Katarina was at work, and our neighbors on that side of the house were out of town today.
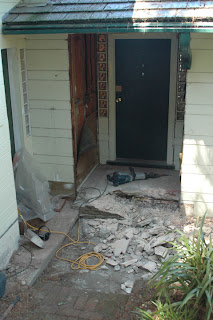 I'd had some (very) vague hopes that I'd be able to remove the front of the step that sticks out beyond the foundation, and then just build the floor over the rest of the porch. But those hopes were quickly dashed when I discovered the wood behind and under the porch was rotted (with some clear signs of termites, too -- ugh). So I took out all the stone, cement and bricks. The front of the step was an odd (well, not odd by the standards parts of this house were built by) collection of concrete, sandstone, sand, bricks and wood. So the front part of the step took me 2 1/2 hours to remove, alternating between the jackhammer, and stopping to remove bits of stone, concrete, brick, insulation, wood, dead rat, and...wait...what? Yes, I found the tomb of legendary pharaoh, King Ratsrkhamun.
He was entombed in a space in the porch, with no obvious entrance (and clearly for him, no exit.) What was more odd (though not as startling a discovery) was that the space also had some insulation in it. Not the 1940s-era cellulose stuff that was near the main DWV vent stack, but some more modern fiberglass batt insulation. Besides the weird cellulose stuff, and some incorrectly installed stuff under the living room floor, the house had zero insulation when I moved in. So what the heck were they doing insulating the front porch??
Anyways, after slow progress on the front of it, the rest went quickly. It was two layers of concrete, and a layer of sandstone or brick on top. Between the multiple layers and the flex of the wood underneath, it came out pretty quickly. I've still got a lot of work to do to remove and replace the rotted wood, but I was able to get the jackhammer back in under 4 hours. Yay!
Today I went and picked up some free drywall (I love freecycle.org!), and rented a jackhammer to remove the old front porch, which will be enclosed and become part of the kitchen. It was covered in flat pieces of sandstone with bricks around the inside edges. I figured it was a good day to do it because Katarina was at work, and our neighbors on that side of the house were out of town today.
 I'd had some (very) vague hopes that I'd be able to remove the front of the step that sticks out beyond the foundation, and then just build the floor over the rest of the porch. But those hopes were quickly dashed when I discovered the wood behind and under the porch was rotted (with some clear signs of termites, too -- ugh). So I took out all the stone, cement and bricks. The front of the step was an odd (well, not odd by the standards parts of this house were built by) collection of concrete, sandstone, sand, bricks and wood. So the front part of the step took me 2 1/2 hours to remove, alternating between the jackhammer, and stopping to remove bits of stone, concrete, brick, insulation, wood, dead rat, and...wait...what? Yes, I found the tomb of legendary pharaoh, King Ratsrkhamun.
He was entombed in a space in the porch, with no obvious entrance (and clearly for him, no exit.) What was more odd (though not as startling a discovery) was that the space also had some insulation in it. Not the 1940s-era cellulose stuff that was near the main DWV vent stack, but some more modern fiberglass batt insulation. Besides the weird cellulose stuff, and some incorrectly installed stuff under the living room floor, the house had zero insulation when I moved in. So what the heck were they doing insulating the front porch??
Anyways, after slow progress on the front of it, the rest went quickly. It was two layers of concrete, and a layer of sandstone or brick on top. Between the multiple layers and the flex of the wood underneath, it came out pretty quickly. I've still got a lot of work to do to remove and replace the rotted wood, but I was able to get the jackhammer back in under 4 hours. Yay!
Tuesday, May 20, 2008
Carter Work Project with Habitat for Humanity, Day 4
Wednesday we worked on siding, doors and various bits and pieces of framing inside the house. Our house in Oakland has v-rustic redwood siding (on the original house; finger-jointed pine or some such on the addition), and the HFH East Bay houses all have Hardie Board cement siding, so I'd never worked with vinyl siding before. With Tom the contractor to instruct me, I found that it's very easy to work with. I don't know about longevity or greenness, but for ease of use it's hard to beat. As with all siding, getting the starter course and the first couple of courses on straight and level are key. After that, each layer snaps into the one below, and with some not fully driven nails (to allow for expansion and contraction), it goes up very quickly. One finer point in working with it is figuring out which way to lap the vertical seams. If you lap it consistently so that the side it's commonly viewed from laps the next piece over, it's hard to see any of the seams.

 We got a start on shingling the roof, but Wednesday ended a little early with a block party put on by the people of Pascagoula. Volunteers from the other building sites were bussed in, good food provided, and I think most everyone went home tired and happy.


 We got a start on shingling the roof, but Wednesday ended a little early with a block party put on by the people of Pascagoula. Volunteers from the other building sites were bussed in, good food provided, and I think most everyone went home tired and happy.
Monday, March 12, 2007
No Man is an Island
 ...but some kitchens are, namely ours. Today, for the first time in too long, I put in a full day working on the house. And work on the house I did. Not even peripheral stuff like organizing the basement so I can store stuff, get to the table saw, etc., but actual work on the actual house.
I finished removing the trim and paneling in the old entry hall (preserving the larger pieces of paneling for future re-use), removed the weird insulation (using my spiffy new 6.5hp shop vac to suck up the stray bits and pieces along with the mouse droppings), and started removing the trim and siding around the outside of the old door.
The result is that the kitchen is now completely cut off from any semblance of an unchanged house. One side has the old window opening that looks into new entry hall. Another is into the dining room, which is stripped down to studs and subfloor. And now the last open side is the hall, which is similarly denuded of finish materials.
I still have a lot to do before I demolish the kitchen, and numerous interruptions in the weeks to come (apheresis tomorrow, for starters), but it felt good to get some progress done on the house.
Friday, February 09, 2007
To Do (and do, and do...)
I've been continuing to work on removing stuff in the old entryway and the kitchen in preparation for the big day, when we cease to have a functioning kitchen. But I've started to realize just how much stuff I still have to do in order to get to where I can gut the kitchen:
Someone on the That Home Site! forums suggested that if you've got two or more bathrooms, that during a kitchen remodel you should temporarily make one of the bathrooms into part of your kitchen space (shared duty between kitchen and bath doesn't bear thinking upon...yrrch!) But in order to do that, the new bathroom needs to be finished. And it would be helpful if the old bathroom had hot water in the sink.
A couple years back I remodeled the area around the shower in the old bathroom, and replaced the galvanized plumbing to the shower with copper. But the sink and toilet still have galvanized pipes, and the hot water to the sink stopped completely last year. Since the bathroom shares a wall with the kitchen nee entryway, it's much easier to deal with that while things are ripped up, but before the kitchen is completely redone.
Fortunately, the unknown insulation in the wall between is paper. Paper pulp insulation, to be exact. So while it's still going to be messy to remove, it means I can do it myself and not hire a licensed hazmat removal company. I'm still baffled at the uselessness of it, though. And what a buffet for silverfish, termites and other creepycrawlies.
- finishing re-organizing the basement storage
- replace the galvanized plumbing in the old bathroom
- finish the new bathroom
- finalize design and measurements on the cabinets
- rewire the light on the carport
- clean up the living room and organize a "kitchen" space
- move out of the kitchen
Someone on the That Home Site! forums suggested that if you've got two or more bathrooms, that during a kitchen remodel you should temporarily make one of the bathrooms into part of your kitchen space (shared duty between kitchen and bath doesn't bear thinking upon...yrrch!) But in order to do that, the new bathroom needs to be finished. And it would be helpful if the old bathroom had hot water in the sink.
A couple years back I remodeled the area around the shower in the old bathroom, and replaced the galvanized plumbing to the shower with copper. But the sink and toilet still have galvanized pipes, and the hot water to the sink stopped completely last year. Since the bathroom shares a wall with the kitchen nee entryway, it's much easier to deal with that while things are ripped up, but before the kitchen is completely redone.
Fortunately, the unknown insulation in the wall between is paper. Paper pulp insulation, to be exact. So while it's still going to be messy to remove, it means I can do it myself and not hire a licensed hazmat removal company. I'm still baffled at the uselessness of it, though. And what a buffet for silverfish, termites and other creepycrawlies.
Monday, February 05, 2007
What the...?
 Most of my house experience is new construction with Habitat for Humanity and building the addition. I've done some work on the house before, and on other people's houses, but I haven't ripped open many walls.
So I was flummoxed when I found this material in the wall when I was working on the kitchen remodel. It's light and fluffy, and incredibly fragile -- the slightest puff of air, and pieces blow away. It's settled into the bottom of the wall cavities, so what insulating value it had is long gone. It had ties around it, as if it were in batts like modern fiberglass insulation.
And I have no idea what it is. I'm going to ask around on-line, but I've never seen anything quite like it. What's curious is that the only place I've found this in the house is in this wall near the bathroom -- and most of this wall is an internal wall, so it's clearly not for insulating against the elements. None of the external walls have any insulation anyways.
The large black pipe is the vent stack for the bathroom. It's a 4" cast iron pipe like the main sewer line.
Sunday, July 02, 2006
Insulation
 I received an email from an old friend in Switzerland who's been reading DIY Insanity. Which reminded me I haven't posted in a while. Not for lack of progress to report on, though. Besides getting the plumbing (successfully) reinspected and finishing up odds and ends, I brought home a large load of insulation. The Golf has faithfully brought home large loads of stuff, but this would have been several trips worth in it. And given the price of gas these days, delivery prices are pretty high. So I rented a U-Haul truck (with much less drama than last time), and Edis and I unloaded the insulation then loaded up the truck and moved to Beverly...er...loaded up the truck with waste from the construction and took it to the dump. There isn't that much, but again more than the Golf would take in several trips.
Alas, the faithful Golf wasn't so faithful today. Kat was driving home and it died in the middle of an intersection. It's now at a repair shop waiting for them to open.
I have most of the insulation installed (R-19 in the walls, except the 4" west wall, which has R-13; R-50 in the attic). I'll be hanging drywall on the walls this week, and barring too many interruptions, probably painting next week. Wahoo!
Subscribe to:
Posts (Atom)


