Showing posts with label framing. Show all posts

Tuesday, September 09, 2008

Final Framing

After last weekend's concrete had set, I laid the new subfloor, and framed the last wall of the remodel where the old front porch had been. Not much of a wall, but challenging to put into place because of the existing house. I built most of it on the ground, but left out the headers and top plate until I'd lifted it up over the bolts (one a regular J-bolt; the other a length of threaded rod that's glued all the way down into the old foundation). You may notice the mis-matched headers, one a 4x4 and the other a 4x6. 4x4 would have been plenty for either, but I had scraps left over from other headers, so that's what I used.

Some house wrap, some shims (matching the existing floor means the whole thing isn't quite level), and some self-adhesive flashing, and the last windows were in. The siding will take a while longer, since I'm going to demolish part of the front walk before proceeding with that. And because I may not have enough salvaged scraps of the 1x12, so I'll have to mill some of my own.

I pulled out the old front door, and salvaged most of the glass block that was along side it, and demolished the wall they were part of. Suddenly we have a bigger space that even looks like part of the house instead of some weird little closed with large windows. Yet another step closer to demolishing the kitchen.

Star was unimpressed.

Tuesday, May 20, 2008

Carter Work Project with Habitat for Humanity, Day 5

With rain in the forecast for Thursday and Friday, four of us (Tom from NY, David from FL, Rich from CA and myself) decided to get an early start on finishing the roof. We left the hotel in Biloxi about 5AM (my body was just starting to get the idea that it wasn't 3AM) and arrived at the work site about 5:30AM. The drywall guys doing the texturing were just finishing up inside house #17.The Carter Work Project is a blitz build, moving at an unbelievable pace. A big part of that is incredible work on the logistics for the event, including food for thousands of volunteers (provided mostly by the Salvation Army), building the foundation and framing the walls ahead of time, and staging the tons of building materials needed, all spread out across multiple towns in multiple states. Another big part are the Habitat 'gnomes'. These men and women come in at the end of the normal work day, run the plumbing and electrical, and hang and texture the drywall after the volunteers go home. A huge 'thank you!' to all the Habitat gnomes who made the project possible.

After chatting with the drywall crew, we got up on the roof and got to work at first light. It was overcast when we started, so we worked through breakfast (Frank, our house leader, got us some food while we kept going). But the forecasters were right. We got down off the roof (and back up later) because of heavy rain or lightning multiple times. The rain didn't bother us much (though I think us being up there was raising Norm the block manager's blood pressure because none of us were wearing a house leader's yellow shirt), but we got down very quickly when the lightning started up.Others worked mostly indoors or on the porch installing trim, spreading insulation in the attic, hanging doors, and installing the kitchen cabinets.
After lots of trips up and down off the roof, we eventually got it finished. The work day ended a little early for the closing ceremonies back in Biloxi. Because of the weather, they were held at the hotel instead of at Yankie Stadium. That was OK by me because it meant one less bus trip.

Monday, May 19, 2008

Carter Work Project with Habitat for Humanity, Day 3


Tuesday's tasks included putting the roof sheathing on, installing windows and attaching the roof trusses to the house with endless hurricane clips. While the basic construction of the homes was similar to what I'm used to, there were some differences. Here in earthquake country, there are large holddowns to bolt the house to the foundation, and a lot of thought goes into providing shear strength in different directions. We use hurricane clips to secure the roof to the house, but in flood- and hurricane-prone Pascagoula, there were no holddowns, and even more hurricane clips than I'm used to. When we started on the shingles, we also used 6 nails per shingle instead of 4 nails.

Carter Work Project with Habitat for Humanity, Day 2

Very early Monday morning, busses began shuttling volunteers to the various work sites. Some people were constructing new frames for houses, working near the historic Biloxi lighthouse; others were rehabbing houses in various cities around Biloxi; the majority of the volunteers were building new houses up and down the Gulf Coast. Our group from Habitat for Humanity East Bay worked on a new house in Pascagoula, MS. It's one of of 20 houses being built in Pascagoula as part of the Carter Work Project. We started Monday morning with a foundation and a pile of pre-framed walls. Because of the risk of flooding shown by the 2005 hurricanes, the new flood plain data means the foundation was about 5' tall. Most of the existing houses in the neighborhood sit barely 1' up, sometimes less. After a bit of figuring out where things were and the experience levels of different people, we got to work and fairly quickly had some of the exterior walls standing. We had a variety of people working on the house. Besides our group from HFH East Bay, there were a number of young people who work for the Knight Foundation (the biggest sponsor of the 2008 Carter Work Project), several people who work for Habitat for Humanity International, and individuals from all over the country. The house leader for #17 was Frank, a building inspector in Michigan. The assistant house leader was Gregg, who works for the host affiliate for the Carter Work Project, Habitat for Humanity of the Mississippi Gulf Coast (HFHMGC). We were also fortunate to have Tom, a contractor from New York. He's served as a house leader on past Carter Work Projects.The Carter Work Project goes at an accelerated pace, and Frank and Gregg were feeling the pressure to try to keep up with the aggressive schedule. So a bunch of us stayed late to get the last roof trusses installed. By the end of a late day on Monday, we had all the walls standing and the roof trusses installed. It was a tiring day for all of us, but especially for those of us on Pacific Daylight Time.

Thursday, May 10, 2007

Oy Vey

In very exciting news, I worked on the house yesterday. In even more exciting news, I worked on it again today! Though neither was what you'd call a full work day, it felt awfully good to do some work on the house.

But I realized just how long it's been since I did any work on it. I made a list of stuff to do before demolishing the kitchen back in February, and I haven't done any of it yet, and I realized that I forgot some things on the list, too. The last real day of work on the house before yesterday was all the way back to March 12th, almost two months ago.

Oy vey.

But yesterday I cleaned out the dining room, which had become a storage area and staging area for the Mexico mission trip, Habitat / Thrivent Builds workdays, etc., tidied the basement, and weed-whacked the backyard. Today I cut a little of the old subfloor and a little of the new subfloor in the dining room so I could insulate the odd little gap between the ledger board and what passes as a rim joist and put new subflooring down.

I also installed the post that ties the HBB to the foundation. Lest the cantilever section of the loft cause the far end of the beam to lift up, the city engineer specified the HBB had to be tied to the foundation with a 4x4 post. Originally I was going to have to put a 16x16 footing under it, too, but I got him to sign off on a 12x12 instead since that already existed. I still have to drill into the foundation for a bolt for an earthquake holddown to connect it to the foundation, but it was a nice chunk of work to get it into place. I used a 4x6 instead of a 4x4 to account for the existing wall being a little off the foundation. It hadn't shifted -- they'd actually notched a 2x4 to hang over the outside to make things line up.

Friday, February 02, 2007

And So It Goes

I began work on moving the doorway into the center of the house from the entryway (which will be part of the kitchen) to the living room, a grand total of about 3'. I knew there was electrical there (a switch for the hall light that can stay, and an outlet that's where the door will be), and based on work in the dining room (where cutting power to the dining room light ended up cutting power to the basement and the carport), I knew there were likely to be, um, complications.

So this time I checked which side the power was coming from, disconnected it, and tested everything that seemed like it might be down circuit from there. Expected casualties: an old outlet in my office (no big deal since I added multiple outlets on a new 20A circuit for my computer gear), an outlet in the living room on the other side of the wall from that, but no major losses. So I turned off the power, removed the outlet, covered the end of the wire with power (it'll eventually get pulled up into the attic and removed), and Bob's your uncle, right? Well...after turning the power back on we noticed that the phone which plugs into an outlet in Katarina's office was off, and a floor lamp was, too. Oops. Seems this particular circuit ran down from the attic to the hall outlet, around my entire office, then around Katarina's entire office. Fortunately the lights still work, but I kind of wonder about the outlet in the bathroom...

I also noticed that the people doing the framing again had a limited understanding of what holds a house up. As I've previous blogged about, the doorway between the dining room and living room had a couple of 2x4s stacked (not on edge) for a header. That's a large doorway, almost 6' wide, and a load-bearing wall that holds up the ceiling joists and the roof. So in a little 32" doorway in a non-load bearing wall, what do we find? A proper 4x4 header. And so it goes.

Monday, January 09, 2006

3 for 3

I had the nailing part of the framing inspection today, and passed with no problems. Wahoo!

Some proper roofing and the exterior drywall are next, followed by installing the windows. A quick inspection to make sure I've put the drywall on, then the siding then rough in the plumbing and electrical before final framing inspection. They want to make sure you don't cut through too much stuff in the walls when you put the pipes and wires into place.

I had some questions about the wacky exterior drywall thing with regards to roof venting. Turns out soffit vents are a no-no for my design (walls less than 20', overhang more than 9"), which makes sense since it would let heated air straight into the attic. So I'll be putting vents on the gable ends instead. The other option would be to enclose the soffits, but that wouldn't match the existing house. (And would be a pain to do at this point.)

I may end up making my own v-rustic 1x12 siding. I bought an inexpensive router table, and while waiting for the inspector, tried out matching the profile of the siding. It'll take a while, and produce a heck of a lot of sawdust, but it may be the best option to get what I need.

Wednesday, November 23, 2005

Raising Abel

The trusses arrived yesterday, right on schedule. Thank you Anderson Truss, and thank you Tim G.

So now that I had the trusses, how to get them down from the carport and up to the roof of the addition? Truss companies will normally do rooftop delivery when possible, but given the trees, carport, and power lines, it was most definitely in the "not possible" category. I joked that they could do rooftop delivery if they had a helicopter, but even then I'm not sure it would be possible.

The answer? Follow the tabby cat (her name is Pouspous, which is to say, Catcat in French). Not the white rabbit...that leads to Wonderland or The Matrix. I came up with the idea a while back when I was working in the loft above the bathroom, and my neighbor walked by. We chatted a bit, and I noticed I was at about the same level she was. Our house is below the level of the street, but our neighbor's house on the east side is almost level with the street. And the downstairs in-law unit is right at the same level as the loft.

But even with a plan, I knew I'd still need help. I called Edis to see if he could work, but he had some work as a mechanic (which he's got some training in from Honduras). He paused and thought, and said "How about my cousin?" After some back and forth (how old is he? 18. does he speak any English? no. does he have any experience with construction? a little.), he called his cousin to see if he was available, and then called me back, and we set it up that I'd pick him up at Edis' house at 9am. I made a trip to Economy Lumber for some more OSB and some hurricane clips (they hold the trusses to the tops of the walls, better than just toe-nailing ever could), and then picked up Abel.

In Spanish, it's pronounced ah-bell, rather than the English ay-bull. The second thing I said to him (in Spanish, of course) was "My Spanish isn't very good. Please speak to me slowly." After that, communication wasn't a problem except for a few times I didn't know a word. He's hoping to go next year to English classes like Edis is. I started teaching him a few words, but we conversed in Spanish about family, how I knew Edis, how I'd learned Spanish, etc. The only thing I really had problems with was describing plantar fasciitis. I just said "part of my foot is a little broken" after I stumbled a bit and winced. Fortunately taking some time off, wearing shoes with better support, and Ibuprofen have helped.

So enter the solution to getting the trusses on top of the walls -- follow the tabby cat. I nailed a 2x8 to the outside of the wall, and we put a couple of extra pieces of rim joist I have as a walkway from our neighbors to the corner of the house. We simply picked up the trusses, carried them into the street, down our neighbor's driveway, and out the walkway. The two of us carried the trusses, placed them all at one end of the roof, then moved the boards from the corner of the addition to inside the south wall, so that one of us could walk on that to place trusses while the other walked on the bathroom loft. Worked like a charm. We had to take it slowly, of course, but it was the easiest non-rooftop delivery placement of trusses I've ever been involved with.

Abel and I also put some of the rest of the sheathing up, though there will be some small bits between the trusses. That just leaves sheathing above and around the front door, and around the back door, which is to say, not much.

All just in time, too...the forecast for Friday is rain. Hmmph. Doubtful I'll get roof sheathing on before then, but the tarp is in good shape, and well supported at a good angle for draining water, given the trusses holding it up.

Friday, November 04, 2005

553 Years

That's about how much bad luck I'm in for, if you believe that breaking a mirror is seven years bad luck. The other day I opened up more of the existing wall, in order to install a big post to support the HBB (Hecka Big Beam). I knew our house had no insulation when it was built (I've added some in the attic, and the addition will be really well insulated, of course), but it seems like they skimped on some other things, too, like drywall or paneling. The section of wall I was working on is the other side of the dining room wall, where there are built-in cabinets and a large mirror between the counter and upper cabinets.

Well, when I started pulling stuff out of the wall, the mirror was right there against the studs. That's it -- siding, some building paper, the studs, and then the mirror. Almost might as well just leave the windows open with walls built like that. In any event, I didn't realize what it was at first, and I managed to smack the corner of the mirror with the hammer or the prybar, and crrraaack went the mirror. It's a really big mirror, so I figure it must be worth more years than a little mirror.

Last night certainly qualified. I've been keeping tarps over the addition and the opening in the existing roof because even without rain, we get a lot of fog which drips off the trees. But last night brought wind and rain, and the wind blew some of the tarps off the existing roof, and guess where some of the rain went? Uh-huh. Well, I'm going to be redoing the kitchen and dining room anyways...

Thursday, November 03, 2005

Emmie Get Your (Nail) Gun

Today I made another Home Depot run for a couple more joist hangers, some lumber, and a few odds and ends. Then my sister-in-law Emmie (she's the worship leader at RLC that I've mentioned before, fearless* leader of Holy Ruckus) (*fearless except some fear of heights) came over and helped for a while. She runs her own software company, has three teenage girls, and Peter works full time, too, so she could only come for a few hours. But every bit helps, and it was fun to spend time with her in a setting besides helping make the worship service happen or a family gathering, i.e., chaos.

Emmie nailed up the new joist hangers and installed the joists I cut, while I was working on the last bit of external wall. The wall with the back door is at a 45' angle underneath the corner of the loft. The opening for a door is easy enough to frame, but the 45' angle and bit of QuadLock from the foundation sticking out made it a bit more challenging to figure out, and a lot more challenging to install.

Then Emmie used the nailgun (it belongs to her husband, Peter, so she's used it before so little training was required) to finish nailing some interior sheerwall. I measured and cut for the subfloor decking in the loft, put down some adhesive, and Emmie nailed that in with the nailgun, too.

She had to leave after that, but we had a good time talking about everything from her kids to (lack) of privacy on the WWW to the contemporary service at RLC to an interview on NPR with Jimmy Carter about his new book about America's (waning) moral values. I don't believe all the same things he does nor agree with all the things he said, but I definitely admire the guy and would take him as president over the current regime in a millisecond. And I believe he's truly Christian in his heart, not just saying he is but not behaving like one. How can a president let this happen on his watch while saying he supports human rights (never mind the Iraq war and the lies that lead to it) and call himself a Christian? (What part of "love your neighbor as yourself" does he not get?) And how can a democracy that says it supports human rights do this kind of stuff and ever hold its head high in the world community again? I...I could ramble on for pages about this and raise my blood pressure thinking about it, but it's been written before. I guess the difference is that the mainstream American media and more of the 51% are paying attention to what the 49% have known all along.

Thursday, October 27, 2005

Sus Ojos

Today was a much better day than yesterday. Cloudy to start, but no rain, and sun in the afternoon. I worked with Edis, and we got a lot done. I'd pre-cut the headers, jack studs, and sills for a couple of windows that we'd left out to reduce weight when raising the walls. So while I cut back more of the roof and existing siding to install the wall where the new front door will be, Edis kept busy with putting in the stuff for the window framing.

We got the front wall raised, and I put Edis to installing the header, et al, for the window in it, while I laid out and built one of the wall sections that sits atop the existing dining room and kitchen wall. We raised that, and briefly celebrated because although it sits on two levels because of the Hecka Big Beam, and it had to slide over the existing vent stack for the kitchen, it fit like a glove. (No, not like OJ's glove...it fit well.)

Then I put Edis to work installing the window framing in it while I laid out the last section of "tall" wall, which goes between the entryway and the bedroom and bathroom. And hence it contains the door to the bedroom, so it will get a big header.

Building that wall was a challenge, because it was as tall and wide as the bedroom is wide, so there wasn't much room to nail. But we managed, and got that wall raised, too.

Which leaves two more sections of exterior wall to build, the biggest one being the part that makes up the outside of the loft above the bathroom. So tomorrow we'll build the interior bathroom wall and the loft above it, so we can install the exterior wall above that.

Edis did some cutting along the way, but he's not getting how to use the Skilsaw, so I ended up doing most of the cuts. Tomorrow I may have him bring the chop saw up again, since it's much easier to make straight cuts with that, even if it is slower. But I had to remind him time and again to put his safety glasses on -- "¡Sus ojos!" ("Your eyes!")

One of the biggest framing tasks remaining (beside installing the roof trusses whenever those are ready) is making a cricket on the existing roof to meet the side of the addition. That and installing the sheathing (5/8" OSB) on the walls should keep me busy until the roof trusses are ready.

Just getting the roof trusses ordered is taking a frustratingly long time. There aren't that many companies that make trusses in the SF Bay Area, and some won't even do it for single houses -- they only make trusses en masse for developers doing multi-home developments. I've emailed, then called BayTruss, and only get sporadic responses. I just want to know how much the darn things will cost, then I'll go ahead and order them. But that's taking forever. I'm even considering getting them through Home Depot, though I'm not sure they do raised-heel trusses.

A lot of people haven't the foggiest idea what raised-heel trusses are -- even the engineer who did the calcs for the Hecka Big Beam hadn't heard of them. The concept is pretty simple, though. The heel (the part of the truss that sits on top of the walls) is, well, raised. Why is this a good thing, you ask? Because it allows putting more insulation all the way across the ceiling, instead of having it be squished at the edges of the roof because of limited space. Which makes for a better insulated house, which is more comfortable and cheaper to heat. And it makes installing aforementioned insulation much, much easier.

After I dropped off Edis, I made another trip to Home Depot for some more wood for tomorrow's building. A woman in the parking lot asked if I needed help loading, clearly looking for some money. I said no thanks, so she asked if I could help with some money for dinner. Long story short, 'Vicki' may have been lying through her teeth, but she helped me load the lumber on the car, and I gave her some money for dinner and some more for diapers for her 5 month old daughter. And she asked for prayer, which I'll definitely give. A long while back I heard a sermon on giving to people who are begging. The pastor said he used to always worry that people would just use the money for drugs, alcohol, etc. But then he realized...what if they don't? He realized the Christ-like thing to do was just give them the money, and let God sort it out. So I did, and we both went away happy. And God will sort it out.

Thursday, October 20, 2005

Hecka Big Beam

Today I worked alone. In part because I was expecting to go to the dentist for a chipped tooth (no, not a construction related accident, just bad enamel). But the dentist had a family emergency, so the appointment had to be rescheduled. I'm not sure when it'll actually get looked at, because Monday and Tuesday I'm going to a worship seminar with my sister-in-law (who happens to be the worship leader at RLC where I run sound). It'll be a nice change to listen to a worship service and participate instead of working to make it happen.

I spent the whole day working on the really big beam that will support the overhang over the back door, and provide the header for the opening between the existing dining room and the addition. It's 4"x12" by 16' long, and very heavy.

Yesterday I cut away the roof overhang. The first step today was preparing for cutting the roof and ceiling joists, in particular making sure it didn't all come crashing down when they were cut. I put a 2x8 in the attic across the joists to help spread out the load, then cut away more of the roof to expose the top of the wall where the beam will sit. It doesn't sound like much, and didn't seem like that much until I looked at the pile of debris I generated doing it.

I added braces to make sure the beam wouldn't fall off the top of the wall, put some rollers (formerly known as an old broomstick handle) on top of the wall, and lowered the beam little by little into place. With the rollers there it was a snap to move it out to position, and I could adjust the position by just twisting one of the rollers. Pretty neat. Though it was heavy enough to squoosh the rollers out of round. But with a plumb bob (thanks, Pete) and a guide board on the side of the addition, I got the beam where it needed to be and fastened it down. It'll ultimately be held in place with some metal strapping down the wall, but it's got enough holding it in place for now.

All the cutting, climbing up and down, and sitting in the hot sun took its toll on me. So I took some time after cleaning up the work site to sit and enjoy what will be our new view out the bedroom window. Not too shabby, eh?

Wednesday, October 19, 2005

Parfait Got Layers

"Parfait got layers." And so do roofs. At least properly constructed ones. Most people think shingles are what keeps water out of their houses. That's partly true, but shingles are there to protect the tar paper that's the real moisture barrier.

Today I worked with Edis, and while I started cutting back the roof, I tried to keep him busy with finishing up some things and fixing some others. Cutting through the roof took a while, because there's a lot of layers to it: shingles, tar paper, plywood sheathing, old skip sheathing.

It was gratifying to see that the roof I put on a couple of years ago was working properly. There was plenty of crud stuck between the cementious tiles (they look like wood shakes, but are Class A fire resistant), but beneath them, the tar paper and plywood was dry as a bone. In the picture to the left, you can see the multiple layers of shingles and multiple layers of tar paper (This is near the edge of the roof, so I'd added an extra layer of tarpaper underneath. In colder climates where there's freezing and thawing, that layer is normally a self-adhesive membrane.)

But all those layers take time to cut through, especially when the plan is to cut through them no more than necessary, and to not cut through the roof and ceiling joists until things are properly supported. And more time yet when the shingles are cementious tiles, which require a special blade on the Skilsaw to cut.

I had Edis add the header to a window, including doing the measuring and cutting. In the past, I've done all the measuring and cutting and showed him where to nail things, so this was a step up in responsibility for him. To paraphrase Spiderman, with greater responsibility comes the chance for greater screwups. He didn't do too badly, but he's still not very good with a Skilsaw. I explained to him that it's like driving a car. If you look right in front of the car, you'll swerve a lot making corrections. It's the same with sawing -- you want to look further ahead and make sure you're headed towards your overall goal, and your corrections end up being fewer and smaller.

As with many teenagers, I think Edis has some of the feeling that he's immortal. He's bright, energetic, and friendly. But I've lost track of the number of times I've had to remind him of safety things, like wearing safety glasses when using power tools like saws. I also had the opportunity to remind him of the adage in construction, "measure twice, cut once". I've certainly made my share of mistakes, but that's where some of the real learning comes in for construction. Mistakes will be made, but it's how you deal with them that sets things apart.

Despite that, we made good progress. I cut away the roof overhang, Edis finished the framing on a couple things, and we put the Really Big Beam® on the roof in preparation for the next step.

Friday, October 14, 2005

Muy Pesado

Yesterday I finished the subfloor, and measured and cut all the pieces for the stairs. I borrowed a nailgun from my brother-in-law Peter, and with the correct connectors so I could actually use it, I made short work of finishing up the nailing on the flooring.

Today I worked with Edis again. When he called the other morning to see if I had work for him, my brain did a major gear grind. I was out of practice speaking and thinking in Spanish, and add in that I'm not a morning person (those who've been on the Mexico mission trips with me would say that's a major understatement) and I was pleased just to figure out who was calling, never mind about what. But we set up that he'd work today, Friday.

I wasn't totally sure about working with him on the framing, because I wasn't sure if I could keep him busy without slowing myself down. And I like doing the framing. Not just because the walls go up relatively quickly, but I like the thinking, measuring, cutting and hammering that goes into it. So I wasn't that eager to have someone else working on it.

But it turned out to be a good thing. While I started noodling over the layout for the first wall segment, I had Edis assemble the pieces of the steps that I'd measured and cut yesterday. As I started measuring and cutting things and laying out the top and bottom plates, I had Edis bringing the necessary lumber down from the carport.

While this was going on, we had a major bit of excitement. Our neighbor Cynthia is off to Albania for several weeks for work (we'll be helping take care of her cats for a bit), and her somewhat elderly aunt and uncle came to take her to the airport. We said hello, and I went back to what I was working on. The next thing I know, there's a crash and thump, and Cynthia's uncle is rolling down the hill towards out front walk. Aiyeee! There's about a 4' drop off from the walkway back to Cynthia's door before the hill starts at a 30° angle or so. He apparently missed the last step down on the walkway, stumbled and fell, and then rolled off the drop off. Fortunately he only suffered some minor cuts (and doubtless some bruises), but was otherwise OK. We let him catch his breath and I looked for any signs of injury besides the cuts, then helped him to his feet and walked him back next door. He could have easily broken bones or worse had he fallen badly, so it's very fortunate that some minor cuts were the worst of it.

Once that was over, we went back to work. We assembled part of one of the bedroom walls (it's long enough that it needs to be built in two pieces). We went to lift it into place on the higher part of the foundation wall, and over the foundation bolts, and discovered it's very heavy. I ended up getting Katarina to come out and help us lift and balance it. Fortunately I'd pretested the holes for the foundation bolts, so it fit like a charm when it dropped into place. I've only worked on 2x4 walls before at Habitat, and scantily framed 2x4 walls on the Mexico mission trips (ratty 2x4s on 24" centers, and no doubling of studs for anything, separate jack studs for windows and doors, etc.), so I wasn't fully prepared for how much heavier a 2x6 wall would be.

When we built the next section of wall, I decided it would be prudent to leave out the window headers until the wall was in place so it would be lighter and a bit more manageable. As this was the south wall, which has 4 large windows, with a large enough span to require a a 6x8 header (a 4x8 + plywood + a 2x8), that turned out to be a good thing. And I brought Katarina out to help first thing, instead of us trying to lift and balance it with two people. But it was still hecka heavy.

There will be one more really heavy wall segment, and one not so heavy but still pretty heavy one that will require lifting over the plumbing stub-outs, but most of the rest of the walls won't be so bad. Of course, there's also that 4"x12"-16' beam to be lifted 8' into place...

Wednesday, October 12, 2005

Vanity, Thy Name is *&$%@#!!

The other day I noticed the bathroom faucet was dripping, so I changed the washer, but it didn't help. I took a closer look at the valve, and it was pretty worn. So rather than just replace the valve, I decided it was time to replace the whole fixture. I talked to Kat about what to get, deciding on something to match the light fixtures and towel bars (brushed nickel) and picked up a new faucet at Home Depot.

I figured I'd work on it after working on the addition, after it was too dark to work outside. But this morning Kat and I woke up early, and rather than annoy my neighbors with some 7AM hammering and sawing, I decided to work on the new faucet. Well, as frequently happens, the project got bigger.

My first discovery was that the shut off valves under the sink didn't completely shut off the water. So I added those to the "to be replaced" list and turned off the water to the house. While I had the water off, I took the opportunity to drain the supply lines to the addition, and the DWV pipes as well. I don't know when I'll be working on the plumbing next, so there's no need for the water to sit there.

The new faucet came with a new tailpiece (the pipe immediately below the sink), so I disassembled the trap to start, because it makes getting to the other stuff easier. The trap had a fair amount of corrosion (not to mention some really unpleasant gunk), so it got added to the "to be replaced" list, too.

I then moved on to disconnecting the water supply lines, and quickly discovered why they wouldn't shut off completely -- the valves were full of corroded crud, courtesy of the old galvanized pipes. Back when I redid the shower, I replaced the water supply lines for that with copper, but didn't touch the ones for the sink or toilet. That day will come...the supply lines going into the wall are galvanized, and were full of more crud.

Then I went to remove the old faucet and tailpiece. The faucet wasn't too bad to remove, thanks to having a basin wrench from installing a new faucet in the kitchen some years back. The tailpiece shouldn't have been too bad, but I struggled and struggled with it, unable to get the two pieces of it separated. I eventually gave up, got my sawzall, and made short work of it. I then discovered why I'd struggled so much -- they'd soldered the pieces togther when they installed it. D'oh!

All of this was increasingly difficult, because the vanity in the bathroom is pretty small, and has an edge at the front of the cabinet that makes leaning into it awkward. So I set up some wood to support my back over that, and put a stadium cushion in the vanity for my head, and then it was at least possible to stick my head under. But oy! I've never had a problem with claustrophobia before, but I had to come out for a break several times, because I just got freaked. But I eventually got the old stuff out, and the new stuff in, which just left the trap.

After a couple of trips to the local hardware store to get a chrome trap, I decided I'd just replace the trap and other drain pipes with plastic. The new tailpiece is plastic, so why not? Plastic is a lot easier to get leak-free, and is more forgiving of pipes not quite aligned. Well, one why not is that the connection into the wall, instead of being a normal compression fitting for chrome pipes is a threaded 2" cast iron pipe. Huh. Finding anything to connect to that is going to be a challenge. I temporarily put the old trap back in, but with a tub to catch the inevitable leaks...and discovered that the hot water supply line is 99.99% plugged with corrosion.

I wanted to get back to work on the addition! So I cleaned up my plumbing tools, and I got out my compressor, the nail gun my brother-in-law loaned me, and was ready to roll. Or not. The nail gun has a different kind of connector than my compressor and air hose. Hmmph. So back into the basement went the compressor, and out came the ol' framing hammer.

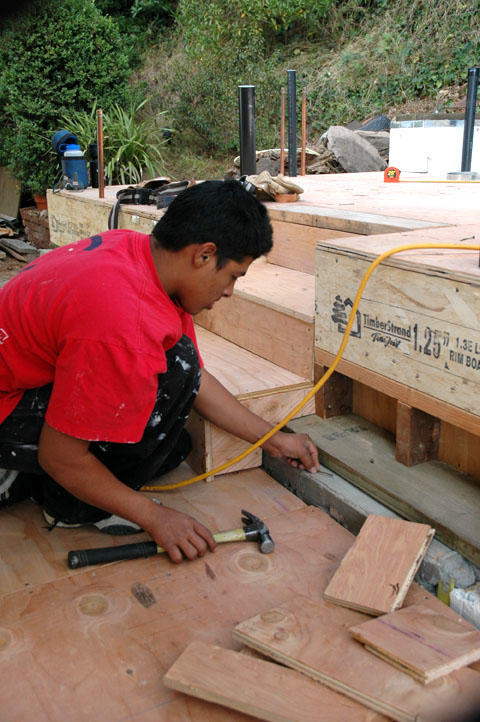
I installed more of the subflooring today, getting almost all of it done, including the tricky parts in the bathroom that had to fit over various pipes. YAHDT was necessary for more adhesive, a new connector for the nail gun, and of course some bits and pieces of ABS piping for the bathroom sink. I found everything I needed for the bathroom, except of course the 2" threaded connector. 2" ABS isn't the same size as 2" cast iron, of course.

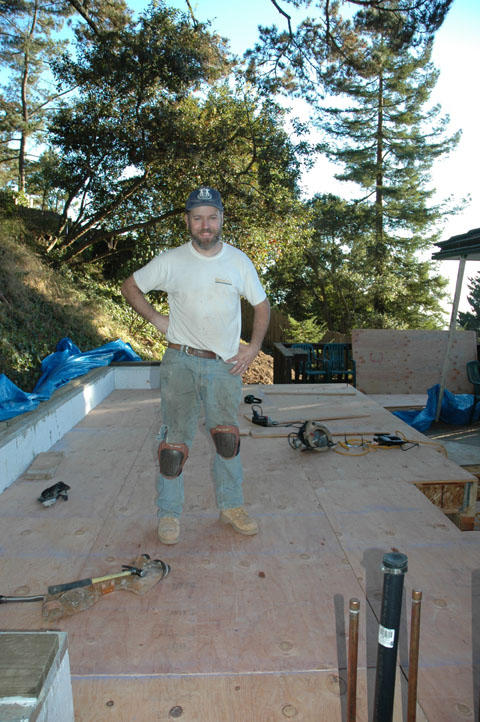
But despite getting side-tracked with the new faucet and dealing with the compressor, I got a fair amount done today. The addition really looks like part of a house now since it has a floor and plumbing stubs. Tomorrow I'll finish up the subfloor, and build the steps up to the bedroom level. That shouldn't be too bad since it's only 3 steps, so maybe tomorrow I'll start on walls. And it was better than yesterday afternoon, which was filled with a trip to Camron-Stanford House to finally finish updating the artifact database so they can update their insurance. Of course, now they want membership lists and other stuff...
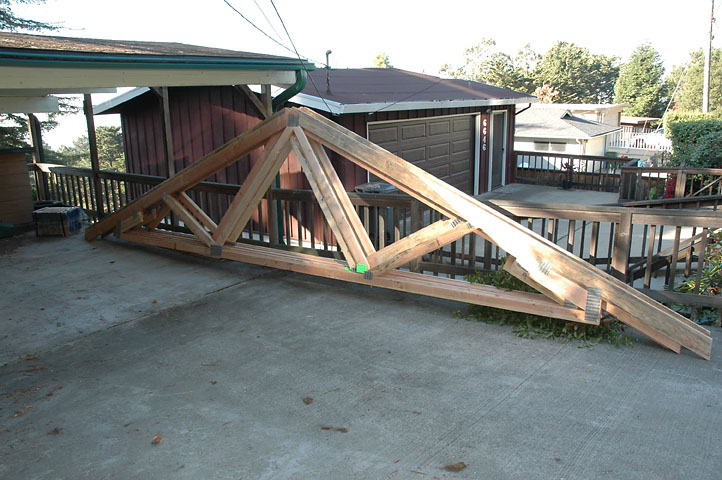
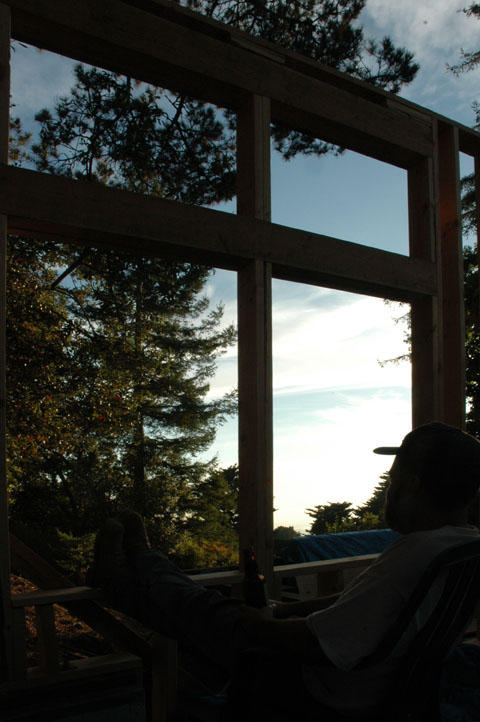
Monday, October 10, 2005

Wahoo!

Well, despite the computer problems, the inspector made it. The guy who doles out the assignments for her is kind enough to print them out and do some optimizing. Like making sure that multiple inspections for a site (e.g., plumbing rough-in + floor framing) get scheduled for the same time and the same inspector (no, really...sometimes they get handed out to different inspectors). But the upshot is that her list was printed out on Friday, well before the computer problems.

So she showed up a little while ago, took a look at the plumbing, re-acquainted herself with the plans, made sure there was access to the crawl space, and didn't even insist I refill the 10' stack. I siphoned out some of the water earlier because as the pipes and water heated up, the water expanded, so it start dribbling over the top of the stack.

She also told me about a couple of things in the shearwall and roof sheathing to be sure to catch when nailing, and that there's a requirement for houses in this area to have sheetrock (aka drywall) on the outside of the sheathing, under the siding, for added fire protection. Given that the siding will be wood, we were both dubious about how much that would actually help, but easy enough to do. It will make it a pain when the wet weather starts.

But I'm 2 for 2 on inspections. And I can put the floor on, and start building walls!*dances about merrily*. OK, that last sentence probably sound weird unless you've played a game like Wyvern, a graphical MUD that my friend Steve created and I did some work on. Hmm...it probably sounds weird even to some people who have played the game.

Optimizing the inspections reminded me of a story with one of Steve's brothers. Back when he was in high school or college or somesuch, he went to work for a pizza place delivering pizzas. Company policy was to make the deliveries in the order the calls came in. Even if that meant going back and forth across town. Steve's brother thought that was pretty stupid, and did a quick traveling salesman optimization and delivered the pizzas in less than the allotted time. After a while of this, the owner came to talk to him. The owner told him "You're a really, really good driver." "Thanks!" "No, you don't understand...you're the best delivery driver we've ever had!" Steve's brother quickly decided this was not where he wanted to spend his life working, at least if he was looking for any form of mental stimulation.

Still Waiting...

The lumber arrived this morning from Economy Lumber. A couple of the 8ft. 2x6s look a bit gnarly (lots of wane), but everything was there. It didn't look like $1000+ of lumber, even with the big 16ft. 4x12. But then I spent a couple of hours moving it from the street into the carport, and it certainly felt like that much lumber. My neighbor Jon offered to help, but I had a good start on it and he was off to an appointment, so I declined.

I've been expecting the inspector to call to let me know a window for the inspection, but hadn't heard anything by lunchtime. And I was reminded this is Columbus Day, so I started wondering if they'd scheduled an inspection for a day no inspectors were working. So I called the city, and found out their computers are down...in the whole building. D'oh! Inspectors are making their rounds as best they can, but without access to their files, well...I may be waiting longer. Hmmph. I'm ready to build some walls!

Wednesday, September 21, 2005

Hooray for MAPP gas!

The "Sweets of the Soul" concert at RLC on Sunday wiped me out. Monday was pretty much lost to resting from that. The concert was a big success. People had a lot of fun, and we raised a lot of money for Hurricane Katrina relief and rebuilding. Let's pray that they don't get clobbered by Hurricane Rita in the mean time.

Tuesday I was thinking the forecast thunderstorms (thunderstorms? in the Bay Area? mooOOoo!) might slow down work, but instead it was taking one of our cats, Rosie, to the vet that did. She had YAAOHB (Yet Another Abscess On Her Butt), basically an area swollen from infection, usually caused by getting bitten by another cat. Since she's been indoors except for a few closely supervised trips outside on harness, the only possible source of that would be our other cat, Star. But as much as they tussle sometimes (mostly stalking and chasing each other around the house), we've never seen them get that violent with each other. Hmmph.

But along the way I've finished the floor framing, installed the duct work for the furnace, and gotten some of the water supply lines roughed in. I still need to finish those, and rough in the DWV (drain, waste and vent system), then get all that inspected. Then I can put the floor down, and start building some walls!

It's been a while since I sweated copper pipes. The last time was when I remodeled the bathroom. The window was rotten and the wall was starting to go, so I redid the whole thing, including replacing the galvanized plumbing with copper. I was almost driven mad by trying to solder di-electric unions (the special parts that connect galvanized pipes with copper), until my friend Jim told me to get some MAPP gas. It makes a lot hotter flame than a regular propane torch, and makes things a lot easier. But my skills were a bit rusty, so I practiced before sweating any joints that matter. We'll see how well I did when I actually pressure test things, but the MAPP gas made things go pretty smoothly.