
I won! Before the Christmas break, I won one of the lovely DIY Network tape measures. With the holiday, I didn't have much time to use it until recently.
In short, it's the best tape I've ever owned. Good extension, glides in and out of the housing like silk, and the double-sided numbers are a nice feature. It'll get its real test in April at the 2009 Habitat for Humanity East Bay build-a-thon. (This year's goal is to frame 20 houses in 4 days; I think the most we've done before is 10.) But so far, I'm lovin' it. Thanks to the folks at One Project Closer and at DIY Network for the contest. You can get one of the tapes (without the DIY Network logo) for yourself at Amazon or your local home improvement store.
On the less impressive end of the tool spectrum, I had my second Powershot stapler die. The concept is great -- put the end of the release lever over the staple exit to maximize pressure where it's needed -- and that part works well. But the ruggedness just isn't there. The first stapler died on one of the Mexico mission trips; the roof crew tried to load staples the wrong way and jammed it up. Its replacement died the other day, when the clip that holds the staples in broke. It can still be used with some tape to hold the clip in, but that doesn't work very well in the long term. Even before it broke, it had a tendency to jam, particularly when nearing the end of a clip of staples. The reviews on it at Ace and Amazon indicate I'm not the only one disappointed in its performance.
Showing posts with label tools. Show all posts
Showing posts with label tools. Show all posts
Saturday, December 27, 2008

Wednesday, December 10, 2008
Still my favorite
Nothing too exciting with regards to progress on the house, but the new headlamp is still awesome. I've been continuing to update electrical (the carport light works again, though I still need to replace the run from under the house up to the carport), remove old electrical, and install insulation. One nice thing about my new headlamp that some of the cheaper options didn't have is that it can be turned upward slightly. When you're looking down, the normal setting is great. When you're looking up (such as between some floor joists), the little bit of adjustment is perfect.
The house is still lacking insulation in a lot of places, but at least there's now a radiant barrier under the areas where there's nothing but subfloor. It stops the worst of the drafts, as well as reducing heat transmission. I'll add batt insulation after the kitchen is done, and I'm done pulling wire and extending the pipes for the new sink location. The slight bit of additional insulation is just in time, too. The forecast calls for highs in the high 40s (versus the high 60s / low 70s we've got now) and rain in the coming days.
The house is still lacking insulation in a lot of places, but at least there's now a radiant barrier under the areas where there's nothing but subfloor. It stops the worst of the drafts, as well as reducing heat transmission. I'll add batt insulation after the kitchen is done, and I'm done pulling wire and extending the pipes for the new sink location. The slight bit of additional insulation is just in time, too. The forecast calls for highs in the high 40s (versus the high 60s / low 70s we've got now) and rain in the coming days.
Wednesday, December 03, 2008
My new favorite tool

Petzl Tikka Plus LED Headlamp
from the why-didn't-I-think-of-this-before department
I'd been mulling over a new work light of some sort. We have a collection of flash lights, I've got a drop light on an extension cord, and even a blindingly bright halogen work light. They each work for different situations, but none is that great for working under the house, and lately I've been spending a lot of time there. I was considering a a Stanley tripod flashlight, or maybe a Dewalt 18v area light, but the basic problems with any of them is that one's (in my case, fat) head gets in the way of the light when you're working up between the floor joists, and if you need to look anywhere else, you need to move the light.So back during our trip to King's Canyon NP back in October, someone in the neighboring campsite had a headlamp. We have a rechargeable fluorescent light we use for reading in the tent, and a classic Coleman lantern for cooking and eating dinner, but K and I admired the headlamp for cooking. At some point much later, a light went on (so to speak) for me: that would be perfect for working under the house. So yesterday after apheresis at the Red Cross, I trundled over to REI, and with the help of an associate (one of the great things about REI is that they use the outdoor gear that they sell so they know it), picked out the Petzl Tikka Plus LED Headlamp.
It's marvelous. Today I installed some more insulation, and then worked on running new wiring for the carport light. While it's still a pain in the butt to get into some of the tighter spaces under the house, the headlamp made it much less claustrophobic, and made me much more efficient because I wasn't always moving the flashlight around to point where I was looking. With the headlamp, I just looked, and there was the light. Turn my head to look for a dropped screw, and there was the light again.
It was magic. So why didn't I think of this a long time ago?
Working with Denim Insulation
Insulation isn't sexy -- CFLs, solar panels, green roofs, those get all the green love. But there are some interesting green insulation options, like soy-based spray foam, and denim batts. Better insulation and sealing of houses is the 'low-hanging fruit' of energy-efficient homes. We need more efficient and affordable solar and other technological innovations, but the most cost-effective place to start is sealing the building envelope. That's been an ongoing project here, since even before the addition. When I moved into the house, there was almost no insulation.
I hadn't worked with denim insulation before, but I'm always interested in greener options. After using up the rest of the traditional R-19 roll I had, I got some UltraTouch. It's made from recycled denim (post-industrial waste) and so has a lovely blue color.
The first thing I discovered is its hecka dusty. Most batt insulation gives off some dust (plus it's all very good at absorbing dust wherever it is.) Usually it's not-good-for-you fiberglass fibers it's giving off. But when I was stuffing the denim batts between the floor joists, I observed a veritable storm of dust coming down. After putting up a couple of batts, there was a visible blue layer on top of the washing machine.
The second thing I discovered is that its hard to cut the usual way (i.e., with a utility knife or a pair of scissors). The UltraTouch website suggests a $30 Cepco insulation knife, a Bosch Foam Rubber Cutter, a hand held grinding tool, or a table saw. Huh? OK, they all make some sense, but I'mtoo cheap too frugal not ready to buy a special tool just to work with insulation batts. And my table saw blade doesn't come out nearly far enough to cut a batt of R-19. So I read a little closer, and noticed it also mentions using a circular saw with the blade reversed. At least with the circular saw you can easily compress the insulation as you cut it. I put my cement and Hardiboard blade on instead of reversing my regular blade, and it works quite nicely. I also found a little handsaw works pretty well for making those little partial cuts you need for getting insulation around a pipe or wire.
Despite the dust and the increased difficulty cutting it, my vote so far is a big thumbs up. The blue dust is much preferable to fiberglass fibers, and the cost was comparable to traditional batts.
Have any of you worked with denim insulation? What's your experience been?
I hadn't worked with denim insulation before, but I'm always interested in greener options. After using up the rest of the traditional R-19 roll I had, I got some UltraTouch. It's made from recycled denim (post-industrial waste) and so has a lovely blue color.
The first thing I discovered is its hecka dusty. Most batt insulation gives off some dust (plus it's all very good at absorbing dust wherever it is.) Usually it's not-good-for-you fiberglass fibers it's giving off. But when I was stuffing the denim batts between the floor joists, I observed a veritable storm of dust coming down. After putting up a couple of batts, there was a visible blue layer on top of the washing machine.
The second thing I discovered is that its hard to cut the usual way (i.e., with a utility knife or a pair of scissors). The UltraTouch website suggests a $30 Cepco insulation knife, a Bosch Foam Rubber Cutter, a hand held grinding tool, or a table saw. Huh? OK, they all make some sense, but I'm
Despite the dust and the increased difficulty cutting it, my vote so far is a big thumbs up. The blue dust is much preferable to fiberglass fibers, and the cost was comparable to traditional batts.
Have any of you worked with denim insulation? What's your experience been?
Tuesday, November 18, 2008
I Want One!
mmm...double-sidedy goodness

My current tape is showing its age. It's at least the 3rd real* tape measure I've owned (* that is, not counting little 10 foot ones, freebies on keychains, and other largely useless ones.) My tapes take a lot of abuse for someone who doesn't work in construction for a living. They've been on Mexico mission trips, to the Gulf Coast, spent countless days on local Habitat builds, and of course been instrumental in building the addition here at DIY Insanity. The DIY Network tapes are fat (and phat, as far as tape measures go). That means better extension and less likely to tear. The stainless steel tape means less likely to rust. And the double-sided part is just gravy. So this looks like a great option for my next tape.
Wednesday, July 30, 2008
Raiders of the Lost Insulation
The shower is completely tiled, and while the grout is curing, I've been working on other things. Yesterday I used my newly revamped ladder to paint under the eaves above the back windows. Still a pain in the back to paint over your head (how did Michelangelo do the ceiling of the Sistine Chapel?), but much easier with the ladder levelers and stabilizer making the whole thing easier to position (it now goes around windows!) and much, much more stable.
Today I went and picked up some free drywall (I love freecycle.org!), and rented a jackhammer to remove the old front porch, which will be enclosed and become part of the kitchen. It was covered in flat pieces of sandstone with bricks around the inside edges. I figured it was a good day to do it because Katarina was at work, and our neighbors on that side of the house were out of town today.
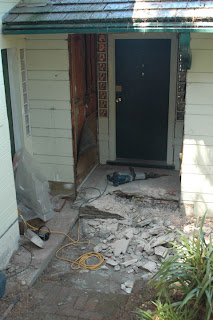 I'd had some (very) vague hopes that I'd be able to remove the front of the step that sticks out beyond the foundation, and then just build the floor over the rest of the porch. But those hopes were quickly dashed when I discovered the wood behind and under the porch was rotted (with some clear signs of termites, too -- ugh). So I took out all the stone, cement and bricks. The front of the step was an odd (well, not odd by the standards parts of this house were built by) collection of concrete, sandstone, sand, bricks and wood. So the front part of the step took me 2 1/2 hours to remove, alternating between the jackhammer, and stopping to remove bits of stone, concrete, brick, insulation, wood, dead rat, and...wait...what? Yes, I found the tomb of legendary pharaoh, King Ratsrkhamun.
He was entombed in a space in the porch, with no obvious entrance (and clearly for him, no exit.) What was more odd (though not as startling a discovery) was that the space also had some insulation in it. Not the 1940s-era cellulose stuff that was near the main DWV vent stack, but some more modern fiberglass batt insulation. Besides the weird cellulose stuff, and some incorrectly installed stuff under the living room floor, the house had zero insulation when I moved in. So what the heck were they doing insulating the front porch??
Anyways, after slow progress on the front of it, the rest went quickly. It was two layers of concrete, and a layer of sandstone or brick on top. Between the multiple layers and the flex of the wood underneath, it came out pretty quickly. I've still got a lot of work to do to remove and replace the rotted wood, but I was able to get the jackhammer back in under 4 hours. Yay!
Today I went and picked up some free drywall (I love freecycle.org!), and rented a jackhammer to remove the old front porch, which will be enclosed and become part of the kitchen. It was covered in flat pieces of sandstone with bricks around the inside edges. I figured it was a good day to do it because Katarina was at work, and our neighbors on that side of the house were out of town today.
 I'd had some (very) vague hopes that I'd be able to remove the front of the step that sticks out beyond the foundation, and then just build the floor over the rest of the porch. But those hopes were quickly dashed when I discovered the wood behind and under the porch was rotted (with some clear signs of termites, too -- ugh). So I took out all the stone, cement and bricks. The front of the step was an odd (well, not odd by the standards parts of this house were built by) collection of concrete, sandstone, sand, bricks and wood. So the front part of the step took me 2 1/2 hours to remove, alternating between the jackhammer, and stopping to remove bits of stone, concrete, brick, insulation, wood, dead rat, and...wait...what? Yes, I found the tomb of legendary pharaoh, King Ratsrkhamun.
He was entombed in a space in the porch, with no obvious entrance (and clearly for him, no exit.) What was more odd (though not as startling a discovery) was that the space also had some insulation in it. Not the 1940s-era cellulose stuff that was near the main DWV vent stack, but some more modern fiberglass batt insulation. Besides the weird cellulose stuff, and some incorrectly installed stuff under the living room floor, the house had zero insulation when I moved in. So what the heck were they doing insulating the front porch??
Anyways, after slow progress on the front of it, the rest went quickly. It was two layers of concrete, and a layer of sandstone or brick on top. Between the multiple layers and the flex of the wood underneath, it came out pretty quickly. I've still got a lot of work to do to remove and replace the rotted wood, but I was able to get the jackhammer back in under 4 hours. Yay!
Monday, July 21, 2008
Old Things Made New
 We have a L-shaped sofa bed that I probably bought 20 years (it still has one of the more comfortable beds in a sofa bed that I've slept on). For some time now, the built-in recliner has had a mind of its own. You can be sitting there comfortably, and then *bang!* the footrest flies up. We'd (sort of) gotten used to it, but last week we had some of Katarina's visiting Swedish cousins over for dinner, and one of them got the randomly-firing-ejector-seat treatment. So yesterday I decided to see if there was anything I could do to fix it. After carefully pulling back the cloth (and layers of dust bunnies) from the bottom, I quickly determined that there was a broken spring. (I cleverly deduced this by having it fall out when I pulled back the cloth.) Fortunately the spring was broken near the end, so by bending it a little I was able to reattach it, et voilà! We can now safely sit in the recliner without fear of ejection. As an added bonus, the footrest now comes up at a more sane speed than it has for a while. Of course, the upholstery still needs cleaning again, but it's nice to be able to sit in peace.
 On house-related matters, Katarina and I painted most of the exterior a while back. But there's been a section under the eaves on the back of the house, above the bedroom windows that is a pain in the patooky to reach because the base of the ladder has to sit on the side of the hill, and with the windows, there's not much room for the top of the ladder to scootch around as things shift. I considered getting a Little Giant or the like, but some of the positions on the other side of the house would challenge even that. And then there's the fact I've already got 3 ladders (an extension ladder, a longer and heavier extension ladder, and a medium step ladder) and didn't really want to get another one. So I looked around and ended up getting some ladder levelers, and in the way that well done online shopping sites can incite one to do, I got a stabilizer, too. Today I installed the levelers (it requires removing the existing feet and drilling some holes in the legs of the ladder) and tried it out, and between the two, it's like having a new ladder. It's never been this stable before except in those few places where the ground is perfectly level. Good stuff!
Subscribe to:
Posts (Atom)


